If you are working on a Gene/RNA/Antisense RNA, replace the word "Protein" with "Gene/RNA/Antisense RNA" as you read through.
To edit the contents of the Protein
- Double-click the item in the Proteins list in the List Area.
- Or, in the Draw Area, click the Protein with the right mouse button, then select Edit Protein menu.
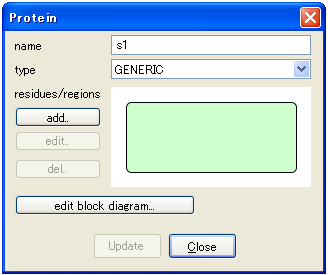
- The Protein dialog appears.
You can edit some of the properties directly inline in the list.
If you double-click on the property which cannot be edited inline, the Protein dialog will pop-up.
- Edit the data.
| name |
Edit the name of the Protein. |
| type |
Specify the type of the Protein. Select from GENERIC, RECEPTOR, ION_CHANNEL, TRUNCATED. The shape will be changed automatically in accordance with the change of the type. |
| residues/regions |
When you click add... button, the circle symbol which represents a residue will be added to the Protein in the preview window, and the sub-dialog ModificationResidue/BindingRegion will pop-up.
| id |
Assigned automatically. |
| name |
Specify the name of the residue (3 letters + residue position number as specified in IUPAC Recommendations 1997) |
| type |
Select residue or binding region. Selecting binding region changes the shape from a circle to a rectangle in the Protein dialog's preview window. |
| size |
Enabled when the type is binding region. Used to change the width of the rectangle in the preview window. |
| side |
Enabled when the type is residue. If the Protein is transmembrane, specify the position of the residue against the compartment. |
| angle |
Specify the position of the residue in the Protein. move slide bar while viewing the position in the Protein dialog. |
|
- Close the subdialog by pressing Close button.
- The residues added here can be directly dragged and arranged in the preview window.
- When you finish editing, click Update button in the dialog.
- The edited data will be updated in the model.
- Close the dialog when you have finished editing the Protein.
If you want to continue to edit the other proteins, keep open the dialog. The data of the newly selected Protein will be displayed in the Protein dialog.
When you finish editing the Protein, the data of all the SpeciesAliases which refer to the Protein will be updated.
To edit the residues already added
- In the Protein dialog, click the target residue or binding region, then click the edit.. button.
- The ProteinModificationResidue/BindingRegion sub-dialog will pop-up.
To delete the residue
- In the Protein dialog, select the target residue or binding region.
- Click del.. button or press [Delete] key or [Backspace] key.
When you delete the residues or binding region of the Protein, all the list that the SpeciesAliases have will be shrunk according to the decreased number of the residues.
In result, there are some cases in which the Species once distinct becomes identical. For details, please check the Modeling Guide.